Right now it's all about brows and here at MUA Towers we wouldn't leave the house without our eyebrows!
For this blog post we've used our FashionistA Brow Kit (£3.50 on our website) which contains 3 shades, a clear fixing gel, a small brow brush and a mini set of tweezers for those annoying brow hairs that pop out of nowhere!
The first thing to do is work out where your brows should start and end - as some people are more blessed in the brow department than others!
Your brows really frame your eyes and can make a huge difference to the way you look!
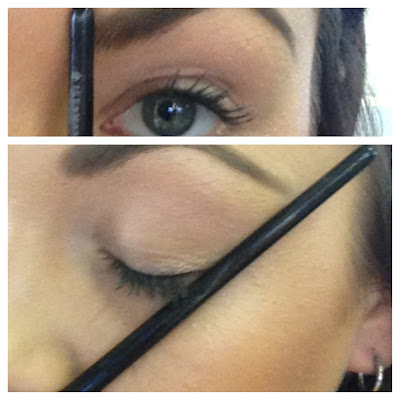
Use a make up brush (or any other straight object) and line it up with the corner of your nose and eye, your brow should also be in line! Do the same with the inner corner of your eye for perfectly calculated brows!
Select the shade that suites your brows - if you are unsure then start off with the lighter shade as it will be easier to darken them if they're too light than try to make them lighter.
Start off by combing your brows to make sure they are all in line/
Then use a small amount of powder to trace along the bottom edge of your brow, this will give you a really clean line and make your brows look nice and tidy. If you are aiming for a very natural look then start at the arch and draw the outer half of your brow and then go to the inner half and join the lines.
For more natural looking brows work from the bottom line upwards rather than outlining your whole brow, or if you are going for the bold look trace along the top line of your brow and fill in the centre!
Once you are happy with the shape and shade of your brows, apply the clear fixing gel to stop any risk of flyaway hairs!
You can get your hands on the FashionistA Brow Kit on our website for just £3.50 (half price!!)
MUA xx


